Everyone does it differently! This is the story of how we did it! Over the past 2 years, we have accessed many articles and blogs available in relation to putting together a vehicle to live and travel in. We have read lots – and would like to thank all those who have made their thoughts, ideas and photos available for the benefit of others. We thought we should give something back! If you read this and have questions – great – fire them off to us, we’d be happy to try and answer them for you.

Why a Troopy – and more specifically, why the HDJ78R?
It just ticked all the boxes! Used extensively all around the world, the Troopcarrier is pretty legendary as a strong and reliable vehicle and it’s able to be modified inside and out to suit. The 1HD-FTE motor is acknowledged as one of the best Toyota has produced. The 6 cylinder factory turbo diesel was fitted to the 78 series between 2003 and 2006, predating the V8 motors in subsequent Troopies. A real attraction of the 78 series is that apart from the fuel injection, this vehicle is electronics free – no prizes for guessing why this is a good thing in a vehicle that will spend long periods of time in remote places! Mileages of 400K plus kilometres are common for these vehicles – low mileage ones are available but they tend to be scarce and expensive – we were prepared to be patient. Tom and Jeanette found one in Perth and Ailsa and I found ours in Adelaide. Peter and Barb’s also turned up in Adelaide a bit later in the piece. All are low mileage (between 100 and 200K) and had been well looked after. Ours and T and J’s were basically unmodified with very few accessories. P and B’s was already fully accessorised and kitted out for living in – which is not to say Pete didn’t put a serious amount of time into preparing it for this trip!
The Build (or evolution) – Ailsa and Stewart
I don’t plan things very well! I’m pretty handy though and have a very well equipped workshop, which is a bonus. Ailsa thinks things through more logically and is a great sounding board for ideas – what could go wrong! In the end we prefer to say that nothing went wrong – we fitted things and removed them, we bought things, tried them and sold them and bought other things, we built things and then rebuilt them, we learnt and re-learnt what would be good and what wouldn’t suit us. Over 2 years, our Troopy just evolved and it’s a bewdy!
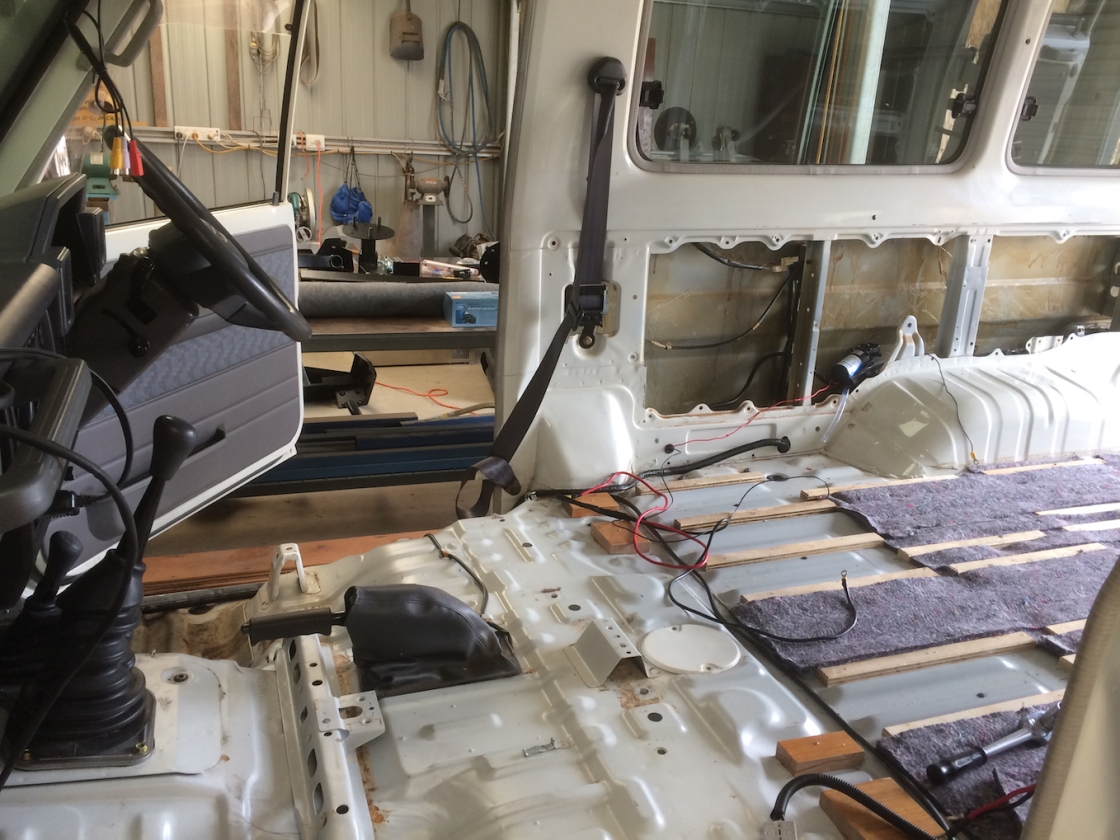
Remove the front and back seats in one of these and you really are left with a shell. I figured whatever was going to happen, I needed a good base to work from, so I fitted a solid flat floor. Troopy floors are far from flat with ridges running lengthways down the vehicle at odd spacings and heights. So, I glued timber batterns between the ridges to provide a flat surface for the ply floor to sit on and screw into, negating the need to drill holes in the metal floor.

Before fitting the 16mm marine ply floor, I added soundproofing and underlay to cut down noise and heat transfer from below. With the side panels removed I ran as much wire cable of various guages as I thought I would need (the electrical system deserves its own story!) and replaced the thin side panels with something a bit more substantial.

Needless to say, the side panels were removed and replaced many times over the course of the build as I modified, improved and adapted the electrical layout. A 72 litre fridge freezer was fitted first, followed by a 60 litre water tank , pump and a tap that located nicely inside the rear door. I built cupboards from 12 mm ply to fit our camping gear – table, cooker, gas bottles, generator, tools, cooking gear and more.

A second battery and battery management system was fitted as was a twin rear wheel carrier and light-bar. Around this time we headed off to Perth, following T and J who were returning home from a trip around Tassie. The Perth trip was to have the roof top conversion done by Alu-Cab and the 270 degree awning fitted. It also gave the 4 of us time to work on planning for the big trip – Tierra del Fuego to Alaska. The trip from WA back to SA gave Ailsa and I ample opportunity to generate a long list of ‘must haves’ and ‘must do’s’. With the proposed departure date still 18 months away, it seemed like we had plenty of time! Yeh, right – life does tend to throw up challenges from time to time doesn’t it!
Over the next couple of months the cheap rear wheel carrier, which didn’t shape up, was replaced with a very expensive, very good one, a solar panel purchased, the electrical system was upgraded and extended and storage in the back improved. A quick trip to Birdsville to catch up with T and J to compare notes and then a trip up to Alice Springs the back way (Lake Eyre, Odnadatta, Mt Dare, Old Andado), provided more opportunities to assess the current set-up and work through ideas to improve things in preparation for a much longer trip!
 Back home again, to maximize space in the back and ensure easy access to that space, we took out almost all the cupboard work and started again – this time with a plan! 16mm marine ply replaced the 12 mm structural ply and 12 plastic boxes fitted neatly into a pigeon hole structure which includes 8 open sections and 2 larger compartments with doors that drop down to provide ‘tables’. In addition, a lidded ‘box’ provides a generous space for all our cooking and cleaning gear, adjacent to the rear doors. Below this space, under a false floor is housed the diesel heater, water pump and water filtration system. A stainless steel water tank was fitted under the vehicle, replacing the plastic one that previously took up space inside.

Across the isle, under the bench seat is a range of storage options, all accessible from inside the vehicle. This is important because there will be definitely be times when going outside to prepare something to eat or drink wont be desirable!


The thousand other things that were done in preparation over the 18 months or so can not be covered here. As I said, flick us an email if you have any queries.

